# Designing Sports Guards with New Materials
## Introduction to Sports Guard Design
[3] So I wanna get into sports car design because we're going to be having new materials come to the market within the next, year or so that are gonna be better and better for direct printed sports cards. [10] What this means is you're no longer printing a model and having to do thermoplastic suck downs, positive pressure suck downs on a model. Instead, you could design the actual appliance and print it, which is kinda cool.
[30] And as the materials get better, I could see this being a more and more viable option. I know SprintRay has a sports card material. Keystone has their second gen that's coming out that is amazing. Right now they're on their first gen, which is mediocre. [50] And then, there's a few other manufacturers that have sports guard materials that are coming on the market as well to compete. And so this is great, more options for us. But let's get into the design.
## Setting Up the Case
[64] To set the case up is really easy. I'm gonna go to default client in Exocad, and I'm just gonna type in sports guard. Now I scan this with an open byte, for this particular case, but there's two kind of theories on sports guard design, depending on the sport. [85] But one is that you want the mandibular index into the sports guard to help kind of prevent mandibular movement during impact. And the other is that you don't want to consider the lower, index at all when you design and just want to do an upper design and it's squishy enough to where the patient the athlete will close down into it and kinda use it as a stress bear point.
## Designing the Sports Guard
[118] So I'm gonna I'm gonna show you guys how to just do the simps simple, maxillary guard, sports guard. I'll go ahead and load the lower jaw so you guys could see what that looks like. But so I'm gonna click any tooth in the upper arch, and I'm gonna go to bite splint three d print. [136] And we're gonna go ahead and change the occlusal thickness to four. And they need to be pretty thick. You probably won't have four millimeters of clearance if you scan with an open bite. That would be kinda crazy.
[158] We shoot for about two and a half to three, but four millimeters with the bites, bite, sports guard is usually good. I leave the bite splint top smoothing and everything else the same. So I'm gonna go ahead and click okay. [176] And I'm just gonna do a single arch appliance, and there we go. I'm gonna hit save, and let's go ahead and go right into design.
## Loading and Adjusting the Model
[188] Now I'm gonna go ahead and load the upper and lower jaw. Although, you could actually just load the lower the upper in and of itself without any kind of antagonist if you choose to. Let's see. Where did I keep those? [203] Yep. So upper jaw first, any OBJ ply or STL file, and then lower jaw.
[212] And so this is the the scan that I, did for the purposes of a bike guard, not a sports card. And so I wanna show you, this is the open byte scan that I did, which would work for retainers, bike guards, and the sport card, whatever you wanna design. [229] And there's a video on how we did that using a, mod jig. But let's go ahead and, actually show you guys how to design this really fast.
## Drawing Margins and Finalizing Design
[245] The first step in exocad is always to rotate the model and look straight down on the arch. And if you don't remember, right click then dragging it on the screen rotates the model. Rollyball zooms in and out, and left and right click translates the model. [252] K. So so that's how you kinda move the model around. But it's important in this first step here before you hit next, you rotate your model, and you just wanna look straight down on the teeth right from the occlusal view just like this.
[264] Here, Exocad's AI tool is going to attempt to auto segment the entire arch for me. You could optionally just hit cancel. And oftentimes, if I'm designing a sports card, I just hit cancel because we draw the borders a little bit differently. [283] So I'm just gonna cancel out the auto segmentation even though it was gonna do a really good job. And we'll show you that for, say, occlusal guard or retainer. But for a sports guard, I typically draw my own border.
[298] I'm gonna pick my path of insertion here to be very similar to the original orientation that we selected during the first step, which is kinda looking straight down. I'm gonna hit set from view. And my offset 30 microns is good. [311] My block out angle of zero is good. I'm gonna allow undercuts up to a 50 microns. And I'm gonna go ahead and keep all the other parameters the same, and I'm gonna hit next.
## Creating the Virtual Model
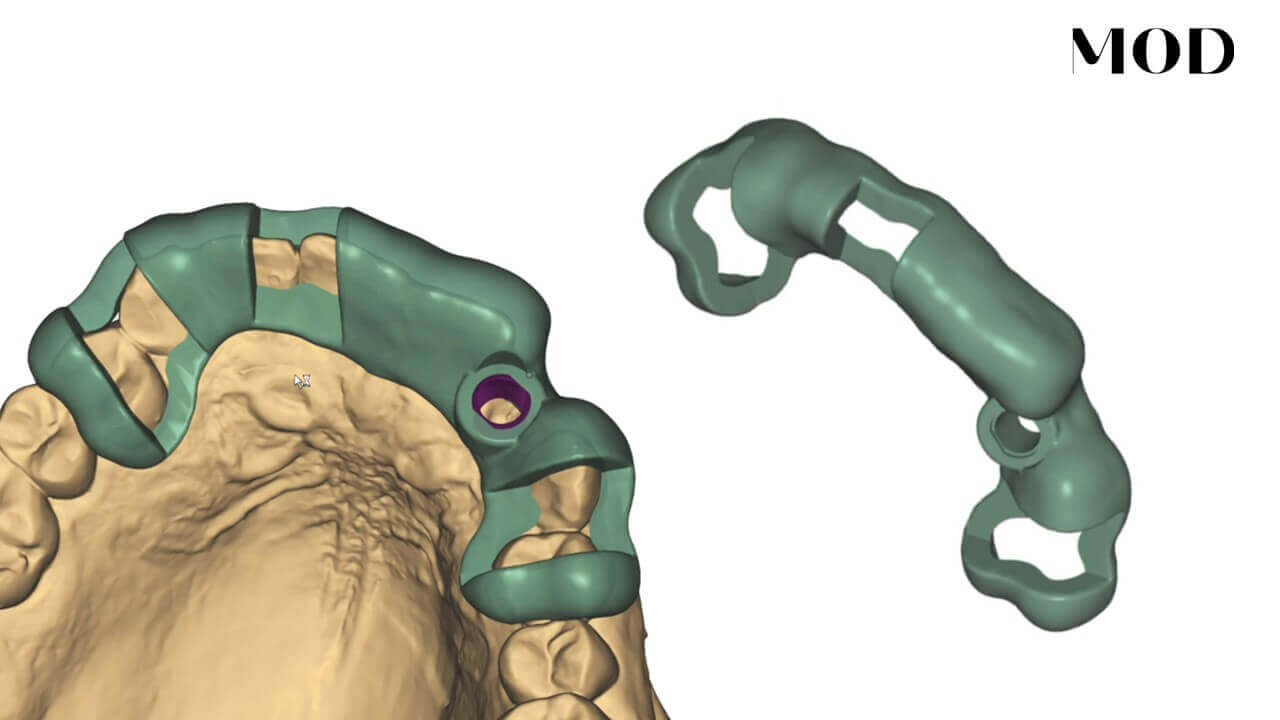
[327] What it's gonna do is it's gonna generate something called the virtual wax up bottom, which is a brand new model that is the model to which the sports car is actually gonna fit to. So so the sports car doesn't actually fit to the intraoral scan. [335] It fits to this new model that's being created right now that has a little spacer. It has some smoothing in areas. Some of the embrasures are filled in.
[368] So let me show you what that looks like. It's right here, somewhere down here. White split bottom. There it is. So you could see it kinda like looks like a low resolution model of what you did. [388] But look, it has some features built into it which will allow the appliance to fit very comfortably and not put pressure in certain areas like the embrasure spaces.
## Final Adjustments and Customization
[388] We have to draw our margins for our appliance. And I like to actually, for a sports card, start on the tissue back here. And on the lingual, I'm gonna go straight to the CEJ just like this. [396] I'm just clicking one time right at the CEJ on the lingual of each tooth just like this. You optionally could go down a little bit, but you don't wanna constrict the airway too much for athletes.
[414] So that's about as low as I'll go, for an appliance. Now on the buccal, I like to come up on the tissue a few millimeters apical to the CEJ. [430] And then on the anterior, I'm gonna curve up and go as far as I scanned. Avoiding this freedom here, I'm gonna come down like this, but you wanna cover this maxilla to protect it.
[455] Combine to that first dot and just go ahead and click double click, and it's gonna seal the deal. And there's a few cool little things that we could do from here. One is that we could come in here and, edit if we needed to. [465] Like, for example, if you're like, oh, I don't like this spot, you can move it and hit apply, and it will then rerender the sports card.
## Adding Logos and Finalizing the Print
[475] There's also some other things that you could do. You could, change some of the settings like the thickness, the peripheral thickness. By the way, for a sports card, I like it to be about 1.5, so I'm gonna go ahead and hit apply there. [489] You need that shock absorption, and that's gonna be mainly the peripheral thickness that we start with, but we have the ability to edit that.
[506] And so here you could see the occlusion. I'm gonna go ahead and show you guys what I like to do. I'm gonna go ahead and add some material here, putting my brush size and strength all the way to maximum. [520] I'm gonna pick up some occlusal contact points here in the anterior.
[530] Now, again, I scan this at an open bite, anticipating a sports guard. If you didn't and you scan this at a closed bite, you probably couldn't do this technique where you're considering the occlusion at all because you scanned in maximum intercuspation. [545] And typically, you wouldn't even load the lower jaw. You you would just deselect those orange teeth in the dental DB and have it be blank.
[556] So once I get that occlusion and I'm gonna go to my smooth, and I'm just gonna smooth up a little bit here. And then I'm actually gonna go ahead and cut by going to adapt static occlusion. [569] Little mandibular indexes for the for the athlete to kinda close down into. And you could do this as deep as you want, by changing the value in the adapt.
[578] For example, if you wanted it, let's see here, to go be a little bit more strongly embedded into the prosthesis, you could go ahead and, change the value here and make even deeper indents. [593] So let's turn off the color here by going to my show distances, and you could see little just little index. Now how deep you do the index is up to you, based off of your philosophy.
[604] You could have no index. You could have, by just not adapting at all and just making it smooth. You could have little indexes like this for the teeth to kinda lock into. [614] And you could have big indexes where where you come in here. I wanna show you. Let me just smooth this out here really quick.
[623] If you want, like, a big massive index, you could go to your add tool, and you could let me put my show distances on here. And you can make these all pretty strong contacts like this. [631] Pink is off the scale, just like that. And you could come in here now and hit adapt, static occlusion, and you'll have bigger bigger marks just like that.
[650] Let's go ahead and, let me turn off the colors here. You see? So we have a nice little index. So that's all, basically, really we need to do. [664] You could come in here and smooth and add thickness if you want to to the the facial. Just remember, we also have to worry about, in many instances, lip competence.
[677] We do want the athlete to be able to breathe through their nose and breathe out through their nose with with having their lips closed. So if you if you make these things too too bulky, sure, they're gonna be very protective, but they also could prevent nasal breathing, [691] which is a in my mind, is a big issue, for many athletes. They have to be able to close their lips.
[703] And and so this is about the the thickest. And here we have one and a half to two millimeters thick on the facial, which I'm just adding a little thickness and smoothing it. And we are about four millimeters thick everywhere else on the occlusal. [732] So that's a really protective guard. I'm gonna go ahead and hit next. And this is where the software is gonna actually adapt it to fit. Because look, it's sticking through the teeth oddly like that.
## Conclusion
[741] In this particular step, which is the merge and save step, is when, it's gonna slice the appliance to fit onto the tissue. Okay? So that's our sports guard in a nutshell. Remember, scanning clinically, if you want the index, you scan at an open bite. [752] If you don't care about the mandibular index, you don't even actually need to scan the mandibular arch. You could just scan the upper arch, and ignore that altogether and just use a uniform four millimeter thick appliance.
[757] So the other thing that I wanted to show you is how do we add, like, little symbols and logos and stuff like that into this appliance. So, what I'll do is at the very end, and you have to wait till it's in the merchant save, you go to freeform restorations and hit next. [772] And you go to attachment and you find you go to usually, you're gonna subtract the thing from the appliance, not add to it, but you could add if you wanted to to do that.
[780] Sometimes it'll hear it'll say embossed or debossed here instead of add, subtract depending on the version of Exocad that you have and your settings in Exocad. But the buttons will be the same. [794] So I'm gonna go to subtract and I'm gonna actually find a cool file. I don't really have one on this computer. So let me load up a browser.
[809] And let me just go to printables, which is a really cool website that has all sorts of three d models for fun and for free. I'm just gonna go to three d models here. I'm gonna hit, accept all three d models. [827] By the way, if you have a FDM filament printer, this is the best one of the best sites to get cool files. But let's just I don't know. Let's say this person is playing lacrosse for a team school team that has a a a mascot that is a, I don't know, a lion.
[844] So I'm just gonna type in lion. Very common. And and to get the kind of two d shape that you want, if you type in key chain, or cookie cutter, typically, you'll get the two dimensional shape. [858] So here's like a cool little lion key chain. Let's say that's kind of the mascot. That's what it's gonna look like. I'm gonna go ahead and show you guys that really cool little file.
[884] Yeah. Maybe we don't need the little key chain part, but let's just for the sake of argument say that the the person you're making this for super jazzed about this logo. So you're gonna hit download and it's gonna download it as a STL file. [894] Okay. So I just downloaded it right there. Now I'm gonna go back to my exocad and I'm gonna come here to my library. I'm gonna go all the way down to load from file.
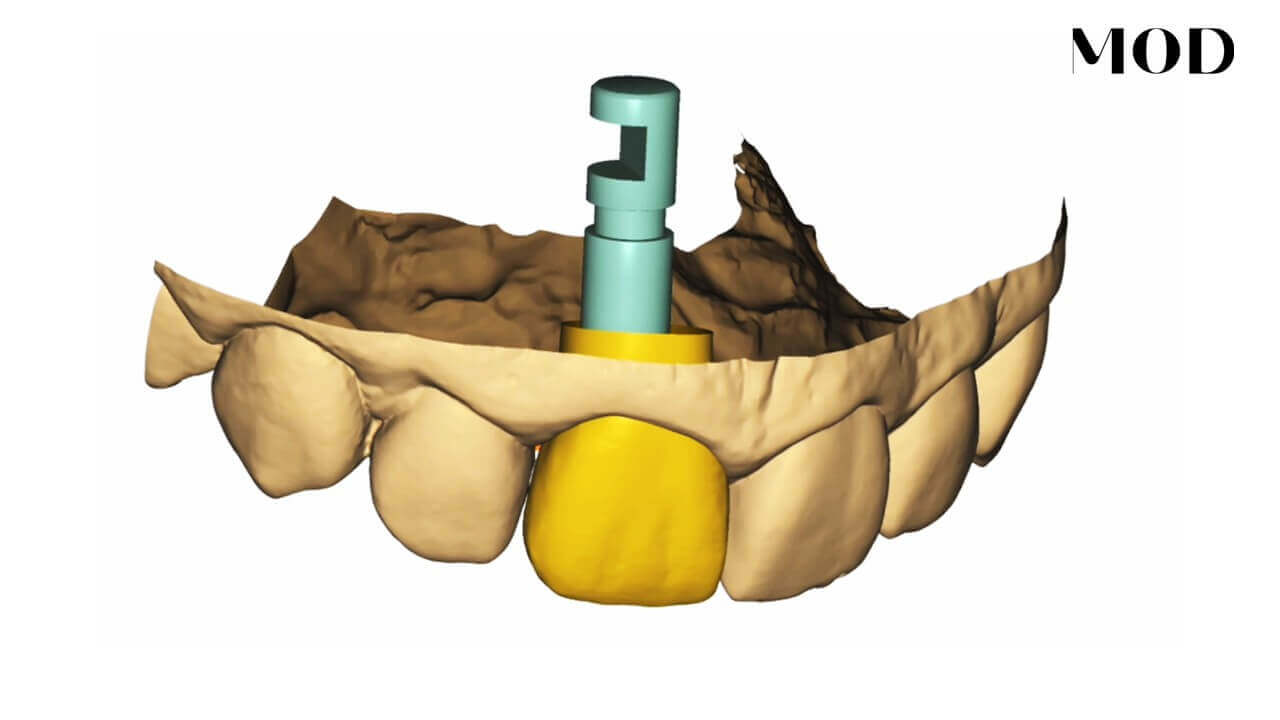
[903] This could be any closed mesh solid STL file. Let's hope that it doesn't give me an error here. I'm gonna go to my downloads and I lie in. I'm gonna hit do not rotate and I'm gonna here here it is. [910] I'm gonna drag it, click it, left click it, and drag it. K. And I'm gonna hold control.
[921] And over here, rotate, hold control, and I'm just gonna very carefully rotate this bad boy. Scale. I'm gonna shrink it. Hold control to uniformly shrink it. [935] Watch this, guys. See? And then I'm gonna it's kinda this is not easy, because of the way Exocad just does this. It's just more complicated than it needs to be to to position to position these things, but, let's just go ahead and rotate it.
[958] There we go. And you gotta get it just right playing around. And it is frustrating. I'm not gonna lie. But once you get it, it's kinda cool. [968] There we go. And you just want it sticking in, but what you don't want I'm gonna hit s for scan.
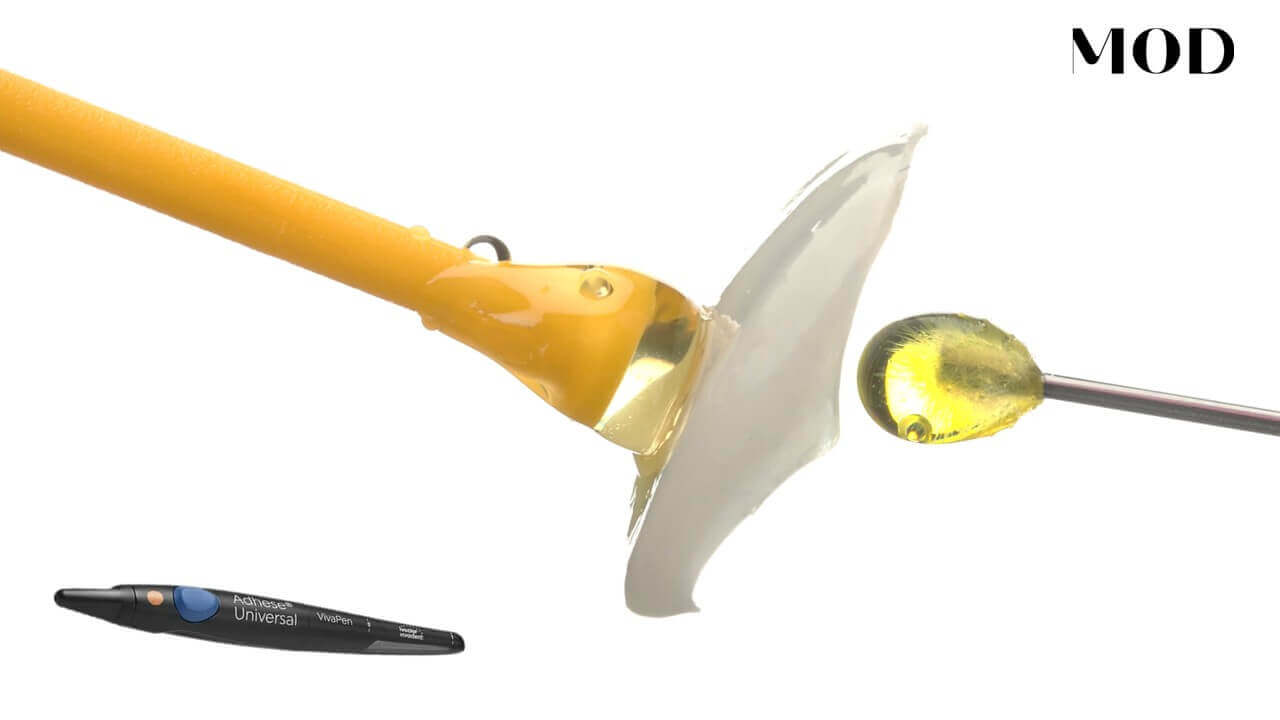
[973] Is you don't wanna actually gonna poke a hole in your appliance, especially where you need the thickness, to be. We are you can fill this in with bike guard resin, of a contrasting color. [984] So most companies, when you buy the bike guard resin, you could get red or blue or black or blue. I wish they made, like, neon pink, magenta, or or something like that.
[991] But what you could do is print the appliance out of one color, let's say blue, and then get the liquid resin from the contrasting bike guard color, let's say red, and you just flow it into this on this hole that's gonna be created and cure it with a handheld light before you put the entire prosthesis in the curing oven. [1010] Okay. I don't have any holes. It looks like I may be okay. Let me just see what happens when I hit apply.
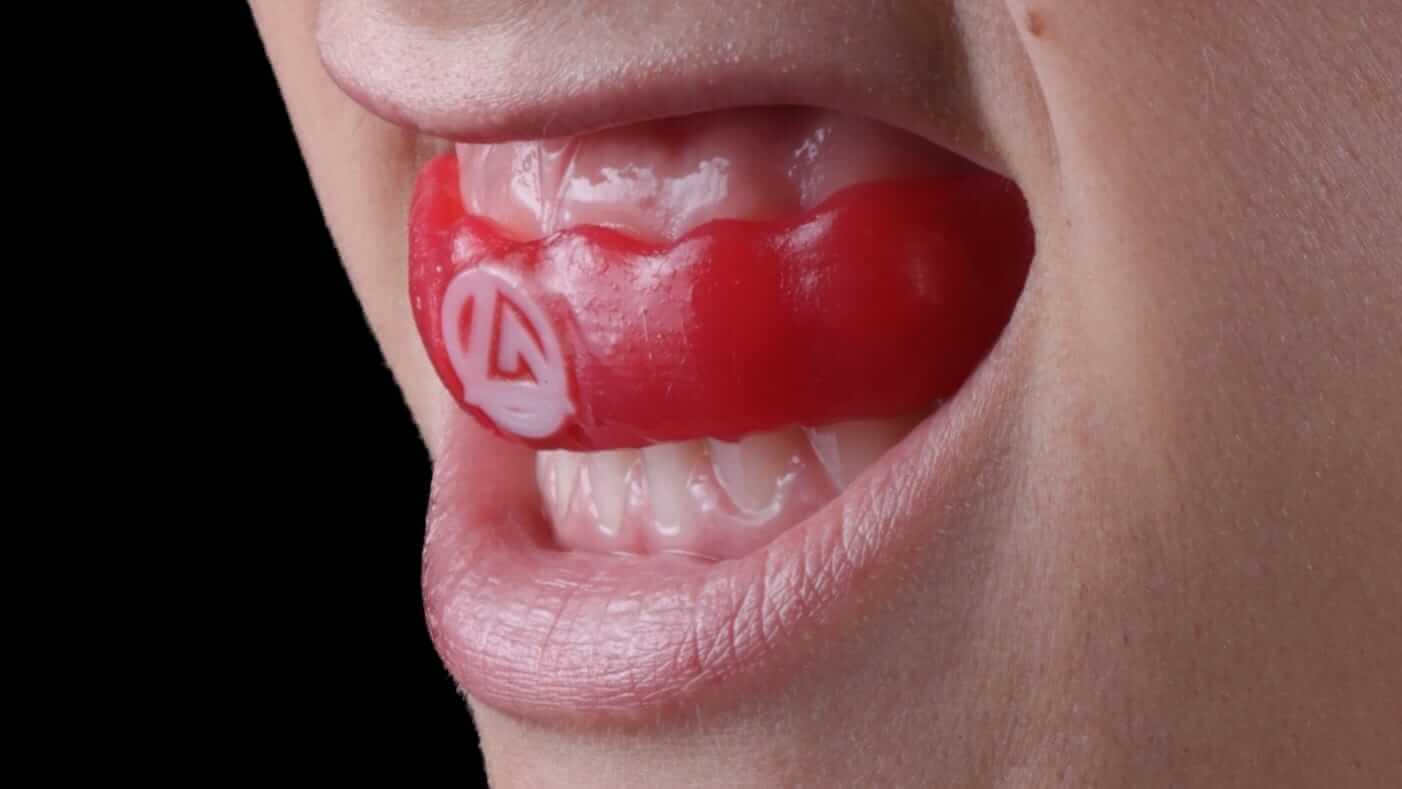
[1023] Let's cross our fingers here that we're gonna have a epic lion. And I'm gonna go ahead and yeah. I think there we go. I'm gonna go ahead and hit next, and now I'm gonna hit save. [1038] We have a sweet little lion logo. And there it is. Turn off my colors for you guys.
[1052] K. So that's kind of, appliances in a nutshell as it relates to sports guards. These are super fun and cool to do, and the materials are evolving to get better and better. They're not gonna be the quality of a trilaminar thermoplastic that has multiple different, indexes of strength and rigidity. [1071] You can actually do biolaminar appliances where you could print a retainer for the bottom layer and then export that design and then bring it back in and design a sports card over that, where then you would bond the sports card to the retainer so you have basically a semi rigid with the soft outer shell.
[1095] Possible. Maybe the topic of a tutorial for another day. So I'm gonna get this, this is automatically saved in ExoCat. I'll show you where. I'm gonna hit I'm done. [1108] And to get this into the slicer I'll I'll go ahead and print it on on Sprint. Right? Let's just try it. You hit open in Explorer, and it's literally right here.
[1123] K? You could also download the SprintRay cloud shortcut and just load it up like that. K. That's super cool. So it's gonna instantly go to Rayway Cloud. [1133] Usually, you have to do this kind of confirmation thingy, once a once a day, it seems to be, for this, to verify who you are and that you're not, I guess, going into somebody else's Rayware.
[1153] So let's just try that again. Now that we've verified the account and have it synced, it should now actually proceed to load up and actually say, yeah, this little green circle moving tells you that it's loading up. [1165] So, again, you have to actually sync it and then kinda redo it sometimes. It's it's a little bit annoying. But now look, if I go to Rayware and I go to new print job, the way that you get it is you go to your cloud drive and then you just go to right here.
[1183] There she is. K. And I'm gonna hit add to print. And I'm gonna call it sports guard. K. Gonna do standard clipping. [1194] I wish I had blue, but I got crimson red. And I'm gonna hit prepare print.
[1209] The RayWire is now optimally, is rotating it and putting the proper size supports on what it thinks would be a good way to print the guard. Unfortunately, it put all the supports on my sweet, sweet lion. [1220] So I'm actually gonna in order to preserve my beautiful lion, I'm gonna actually rotate this to a about a let's see. Maybe about a 60 degree angle and hit confirm and see what it does.
[1249] Is the general rule the more flexible the materials are, the the thicker the supports need to be. Oh, man. It just does not it wants to support my line. [1260] Let me go ahead and go to supports, add or remove individual supports and see. You know what? I don't think we need to worry so much about that half a millimeter overhang right there.
[1283] But I'm gonna come in here and actually add some additional supports to prevent any kind of failure that might occur here. I do know flex the more flexible the material, the harder it is to print because of the way that the supports are. [1303] They could distort under the peel forces, which could warp it. So you in general, you want more supports and beefier supports and less peel forces. That's why I did the 60 degree angle, because you don't want big layers.
[1320] Like, for example, if I went full horizontal, you have a big layer being cured all at once, which is too flexible. So I'm gonna go ahead and send send this, to the printer. [1339] And we'll go ahead and get that started. So that's basically designing sports cards in a nutshell, guys. I I think you could get creative and have a lot of fun with this. I know I do.
[1354] I really enjoy doing these because it, it's cool to see the excitement in the patient's eyes when you put that logo on there and you have it all painted and shiny and it looks beautiful and you pop it in and it fits perfectly. So, we'll go ahead and deliver this as soon as it's done being printed.