# Finishing Retainers: A Step-by-Step Guide
## Introduction
[3] So let's talk about finishing retainers. We have already nested them. I showed you how to design them. Let me grab them right here. This plate's a little slippery. The first thing that you wanna do is wash them. Now I'm just gonna spray wash them here in the studio on my wash unit. I'm gonna plop them down like that, and I'm gonna go ahead and using my pressurized alcohol wash unit, put my glasses on for protection and I'm gonna give it a good spray.
## Cleaning the Retainers
[34] I'm gonna go ahead and angle it down. Now with this particular resin, it's very hard to clean. So you wanna come into the tooth sockets with a clean brush and make sure you get all the alcohol that has started to dilute the liquid resin that's in the tooth sockets out. And you're gonna do this four or five times. It should only be like a ten second, twenty second spray. Make sure you get really in these little incisal edges. You don't want any pooled resin. There we go. I'm gonna get it all washed. Perfect.
## Drying the Retainers
[79] Now they're thin. They're about 600 microns thick, point six millimeters. So, be careful when you do this, but you're gonna have to air dry them. I'm gonna go ahead and get them super dry. I'm using the same WolfBox battery powered air dryer. This thing is legendary, USB c chargeable. It's like a tornado in a can. We're gonna go ahead and dry.
## Handling and Curing
[113] And then you're gonna very carefully use a razor blade because these are easily deformable. You're gonna kinda work under being very careful here. This is where I find a lot of people screw up. They just manhandle these things and they squish them and distort the whole entire arch because it's like rubber at this stage because it has not been cured. And just be patient with it. Razor blades work better. Okay. And here's the key. In this relaxed state, k, you're gonna put it in the curing unit. So you're not gonna take off the supports or anything unlike, say for the bike guard where we took off the supports before we cured it.
## Curing Process
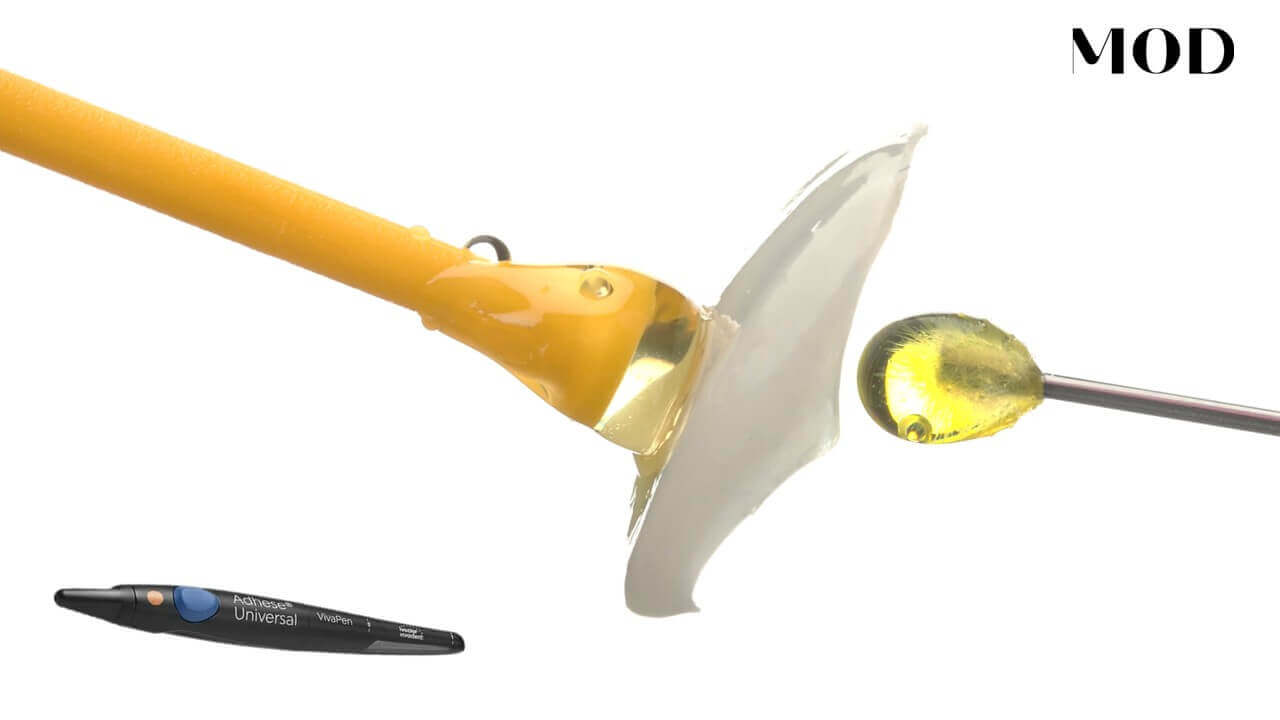
[167] There we go. Okay. So we got these two very dainty, very fragile little things here. I'm gonna go ahead and plop them right into my NanoCure. Not squeezing them. I'm not pressing them in any weird areas. Treat them like they're very fragile. I'm gonna go ahead and close that, and I'm gonna cure it. It's like a seventeen minute cycle here. Let me find it. Twenty two minutes. Once that's done, we're gonna take them out and I'll show you how we trim the supports off and we clean the little bumps up around the supports.
## Trimming and Finishing
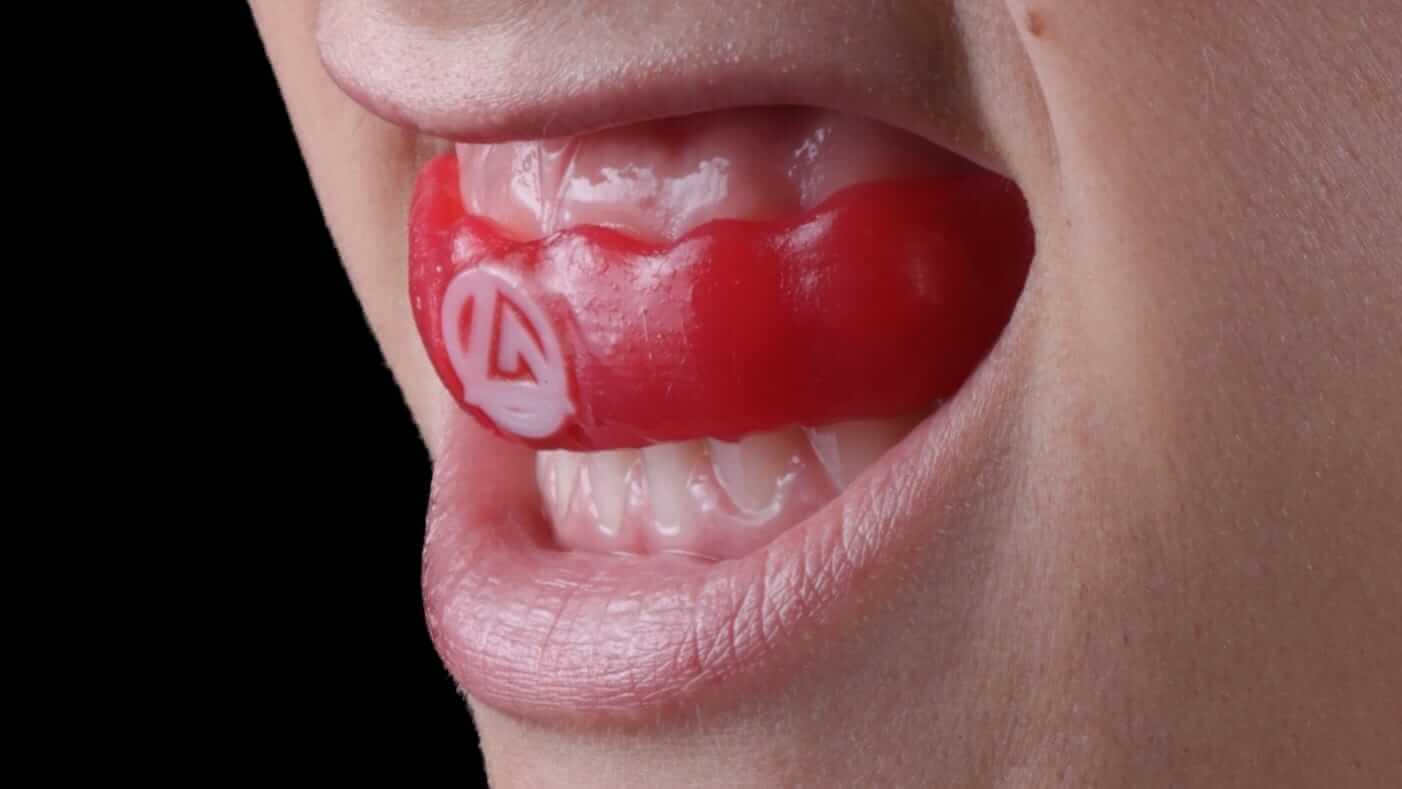
[213] We don't candy coat these. We don't double cure these. We just we're very careful with these retainers to get them to fit perfectly. I'll show you chair side what I do to make the patient ultra comfortable. So let's go ahead and fast track this. We'll fast forward this twenty two minute secure time and we'll go ahead and, get them out. I'll show you how to finish them and remove the support bumps and then we'll take it to the patient. I'll show you how I deliver them. We typically use hot water before we seat them because it's even more comfortable for the patient.
## Final Steps
[234] Alright. So I just got the retainers out of the curing unit. Let's take a look and see how they look. They should be clear. So they go from yellow to kinda clear. They should be shiny. If I let me just rotate the light so you could guys could see. They're they're shiny, clear, and stiff, whereas before they were ultra flexible. And so the best way to finish these is carefully. So what we're gonna do is we're gonna trim them with our flush cutters first. So I'm just gonna go ahead and show you how I do that. I'm gonna go ahead and just use these standard flush cutters and just quickly pop the supports.
## Conclusion
[275] Be careful not to snip, like, the cusp tip-off the cuspid or something crazy like that. You're just gonna work yourself around with flush cutters. And, yeah, is it kind of annoying? Certainly. Is it less annoying than doing models and suck downs and all that? I think so. I think it's more fun, personally. But you if you're used to doing it the other way, you're you're gonna probably think that this way is more annoying. Go around to the lingual as well and get the lingual ones because you don't wanna distort this by, like, being aggressive by trying to peel these. You could you could distort it's still able to be distorted if you're really rough with it. And be careful that it's fully cooled before you do this. Okay? If it's still hot, it's gonna you're gonna definitely distort it. Okay. So now I could just kinda rip it. Yeah. Rip it. Rip it. Rip it.
[343] Okay. So what we have now is a retainer with bumps. Fantastic. Let me do the mandibular arch, put that one off over there, and it's the same exact process. We're gonna come in here and snip these little gotta kinda be aggressive with these. Just gotta kinda go for it. Don't be shy. Just go in there and just crimp them. And this material is like I do use this material for partial dentures. In fact, I did a partial today with it on an emergency patient, And I like the clear material until better options arise. I use this stuff sometimes for some flex partial dentures. Rumor has it multiple companies are releasing flex partial denture material, which would be awesome.
[392] Okay. Just snipping all the way around, and then we're just gonna give it a little kind of man hand, like, twist that. Don't be shy. Just you wanna make sure you stabilize it so that you're not gonna distort it. Okay. So now what are we left with? It at first, it seems like you're left with a disaster. Let me just get rid of this one that I forgot to clip. The you you're gonna be tempted to wanna, like, polish this whole thing up. All you need to do, get you that felt pad and zip it kinda like we did the bike card. Zip it where the the bumps are. Pretty high speed because this stuff's strong and fast. Keep it moving. And don't hit anywhere that you don't need to because you're never gonna get as shiny as the untouched surface.
[491] Okay. Feel with your finger for any kind of bumps. And it's gonna be dusty so I usually take it to the sink with some, Dawn dish soap. Let me see. I got a little particle in here. Make sure you have nothing in your two sockets or anything like that. Take it to the sink with some Dawn dish dish soap and just clean it. You don't wanna hit it with alcohol. Alcohol is gonna make the whole thing frosty again. So I'm gonna go ahead and do that in a second here for you guys.
[542] Okay. Let's go down to the bottom. Yeah. Little bumps. Use your fingers to feel. They're the best they're better than your eyes because this stuff's clear, so it's really hard to see sometimes the little bumps. Now if you really just had to have this thing perfectly optically clear on the occlusal surfaces, you you could, you know, hit it with some mineral oil on a lathe and go go nuts. But I don't think that's necessary. Let me get the dust off of this and show you guys what it looks like. It's it's gonna be it's gonna be nice. Let me just go ahead and clean these off for you and show you. Alright. So I just washed them up. Let's take a a look see here. So they're super beautiful and clear. They don't look cloudy or frosty. They're stiff, but they have memory. And what's cool is if you put them in hot water at this point, you get kind of like a a final fit that's ultra comfortable for the patient. So we'll do that chair side. I'll show you what that looks like.